
Use the staff app at the counter
The Fidelip staff app is the one your team uses at the counter. It runs on iPhone, iPad, and Android phones and tablets. With it you scan the customer’s card, add stamps or points, redeem rewards and vouchers, and hand over the survey.
Install the staff app
Download the app from your phone’s store. In the store it appears as “Fidelip - Loyalty & Surveys” and on your home screen as “Fidelip”. From the dashboard you can also find it in your account menu, under Download the app.


Open the app and sign in with the email and password of the person who will be serving customers. If they don’t have an account yet, create one in the dashboard under Dashboard → Staff (see Invite team members). If the account has two-step verification, the app asks for the code. Anyone who works at more than one location first answers Where are you working today?, because stamps, redemptions and surveys are recorded at that location. The session lasts 30 days on that phone.
The tabs
| Tab | What it is for |
|---|---|
| Scan | The camera. You read the customer’s QR code and add, redeem or apply their voucher. |
| Surveys | You start a survey and hand the phone or tablet to the customer. It shows up when your business has an active survey. |
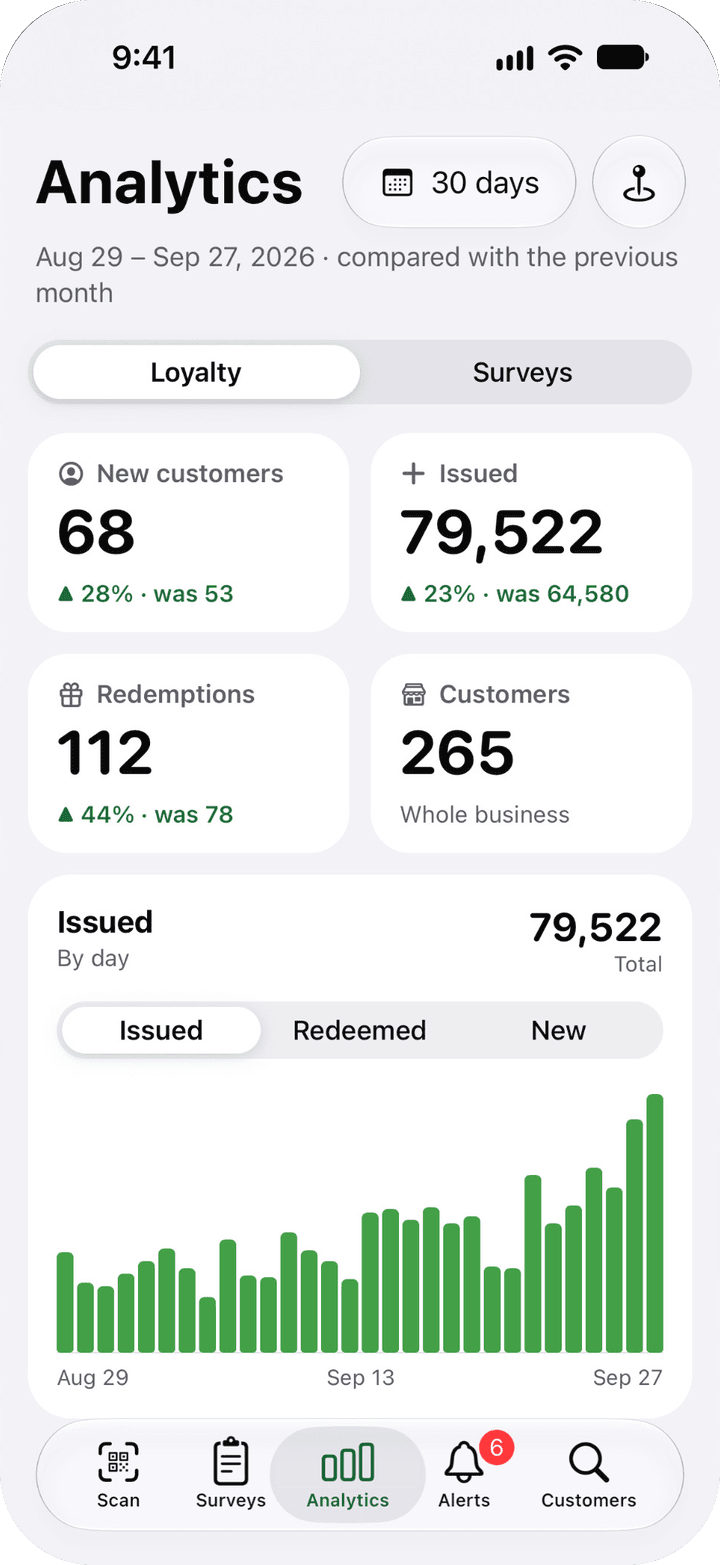
| Analytics | The numbers for the period: new customers, issued, redemptions and survey results. |
| Alerts | The low ratings that come in from your surveys. |
| Customers | You sign up a new customer with a QR code and, if you turn it on, look a customer up to add to their card without scanning. |
On the Surveys plan, which does not include cards, the app shows only Surveys and Alerts.
Add stamps or points
- Open the Scan tabIt is the first screen of the app and it is the camera itself: there is no button to tap first. The first time, it asks for permission to use the camera. At the top you see your location and the flashlight button.
- Point at the customer's codeThe customer opens their card in Apple Wallet or Google Wallet; the QR code is on the front. The app reads it on its own and looks the customer up.
- Pick the card (if they have several)If the customer has more than one card, the app lists them under Cards · pick one, each with its balance and how much is left for its reward. Tap the one that applies. With a single card this step does not appear: the app opens that card directly.
- Add the stamp or the pointsOn a stamp card, tap Add stamp; if your card asks for a ticket number or the purchase amount, the app asks for them right there. On a points card, type the purchase amount: the app tells you how many points that is, promotions and tier included, and the button changes to Add 35 points. On a membership card (the app’s screen calls it Benefits card) the button is Apply benefit and no amount is asked for.
- DoneThe app confirms with +1 stamp (or the points) and the customer sees the change in their Wallet within seconds. Close the screen (Done or the ✕) and the camera is ready for the next customer.
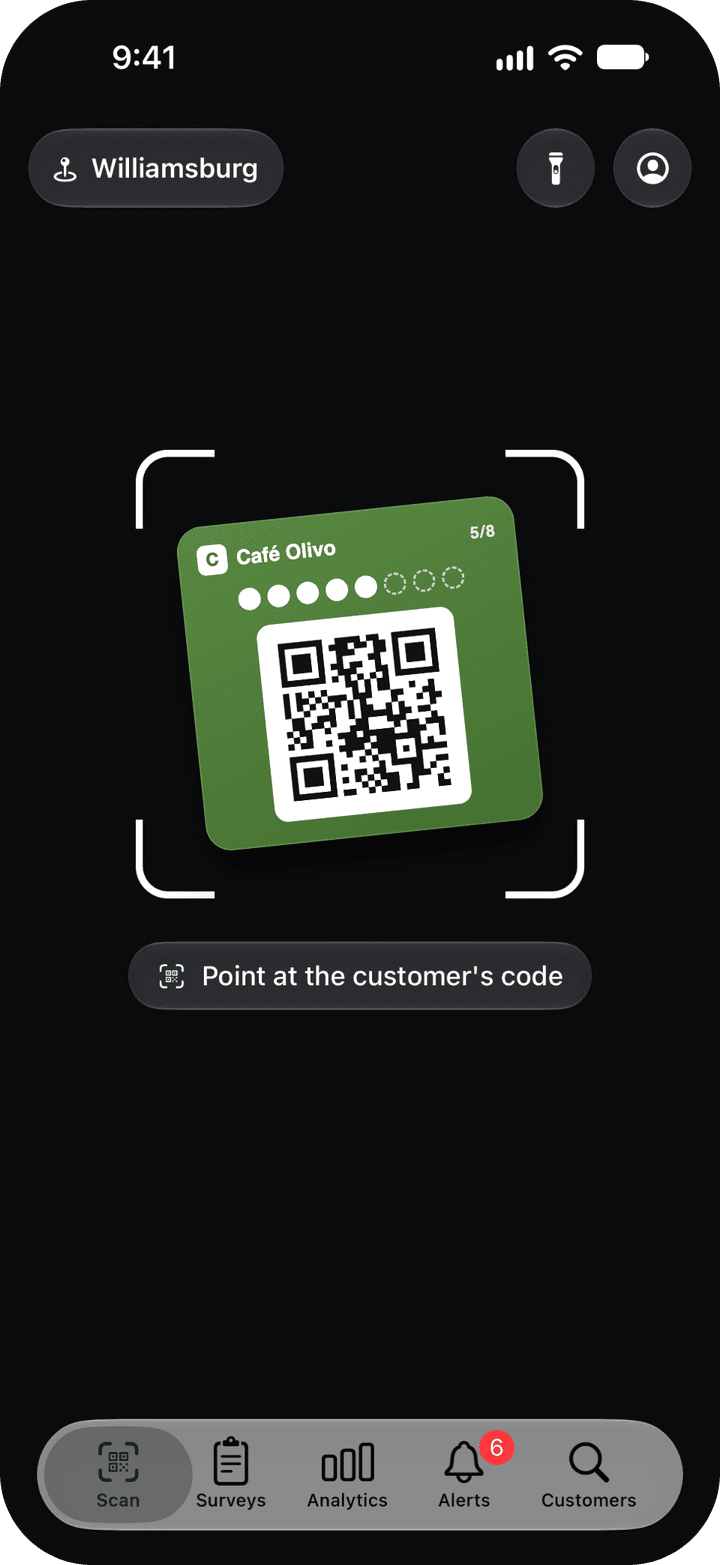
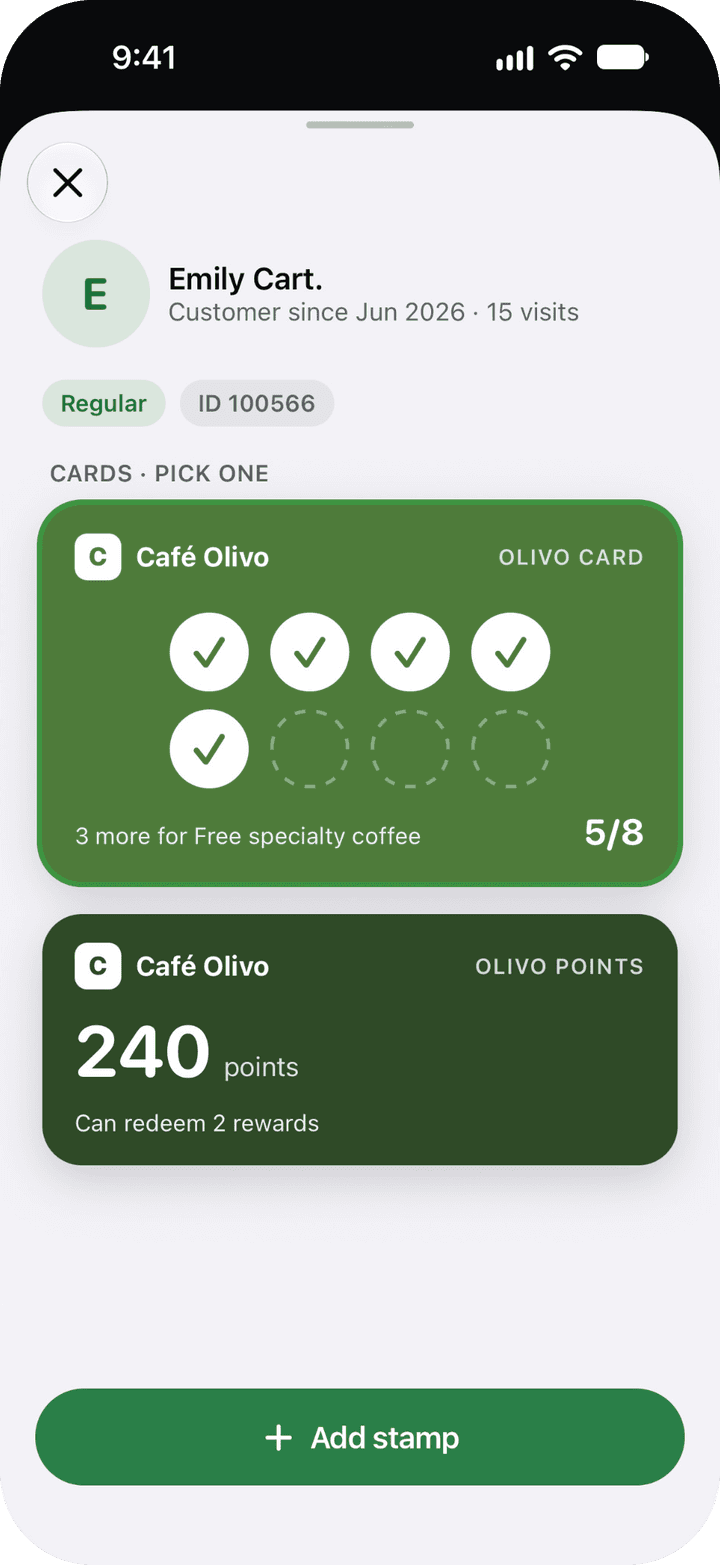
Three things the app does for you when you add:
- Undo. Next to the confirmation, Undo stays for 30 seconds, in case you picked the wrong customer or the wrong amount.
- Wait between stamps. After a stamp, the button takes 10 seconds to come back: a double tap does not give two stamps.
- Repeat purchase. If your card has the repeated-amount check and you record a purchase identical to a very recent one, the app asks Repeat purchase? before saving it. On a points card, an amount of 5,000 or more (in your currency) also asks for confirmation: one extra zero changes a lot.
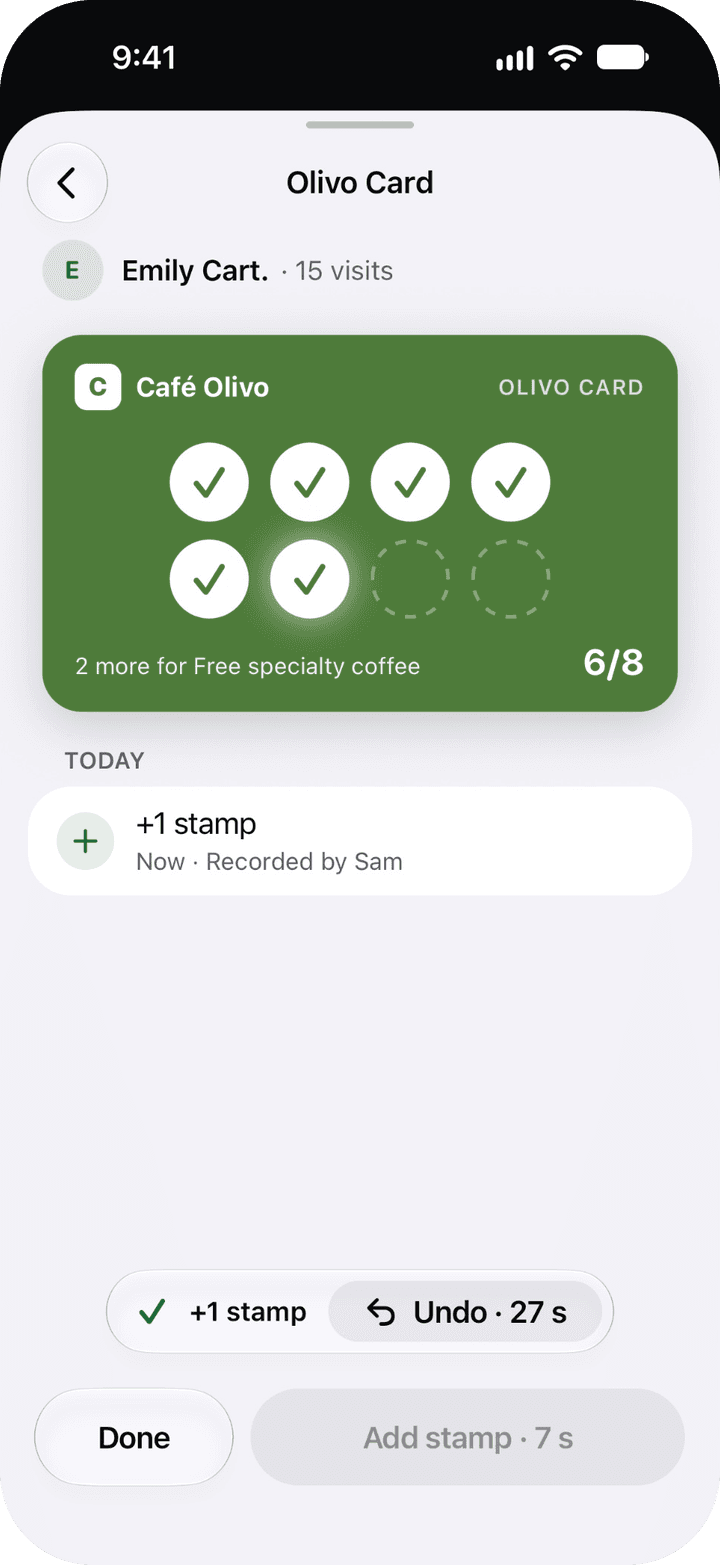
The counter phone is shared, so the app shows only the minimum about a customer: their short name (for example “Jessica Ande.”), their visits, their segment, whether their birthday is this week, their tags (up to three), their vouchers and their card ID. Never their email, and only the last 4 digits of their phone when you look them up by name.
Hand over a reward (redeem)
On a stamp card, the stamp that completes the card is already the redemption: the app shows Card complete! with the reward, records it, and the card starts over. Hand over the reward at that moment. That last stamp can no longer be undone from the app; if it was a mistake, the owner fixes it in the dashboard.
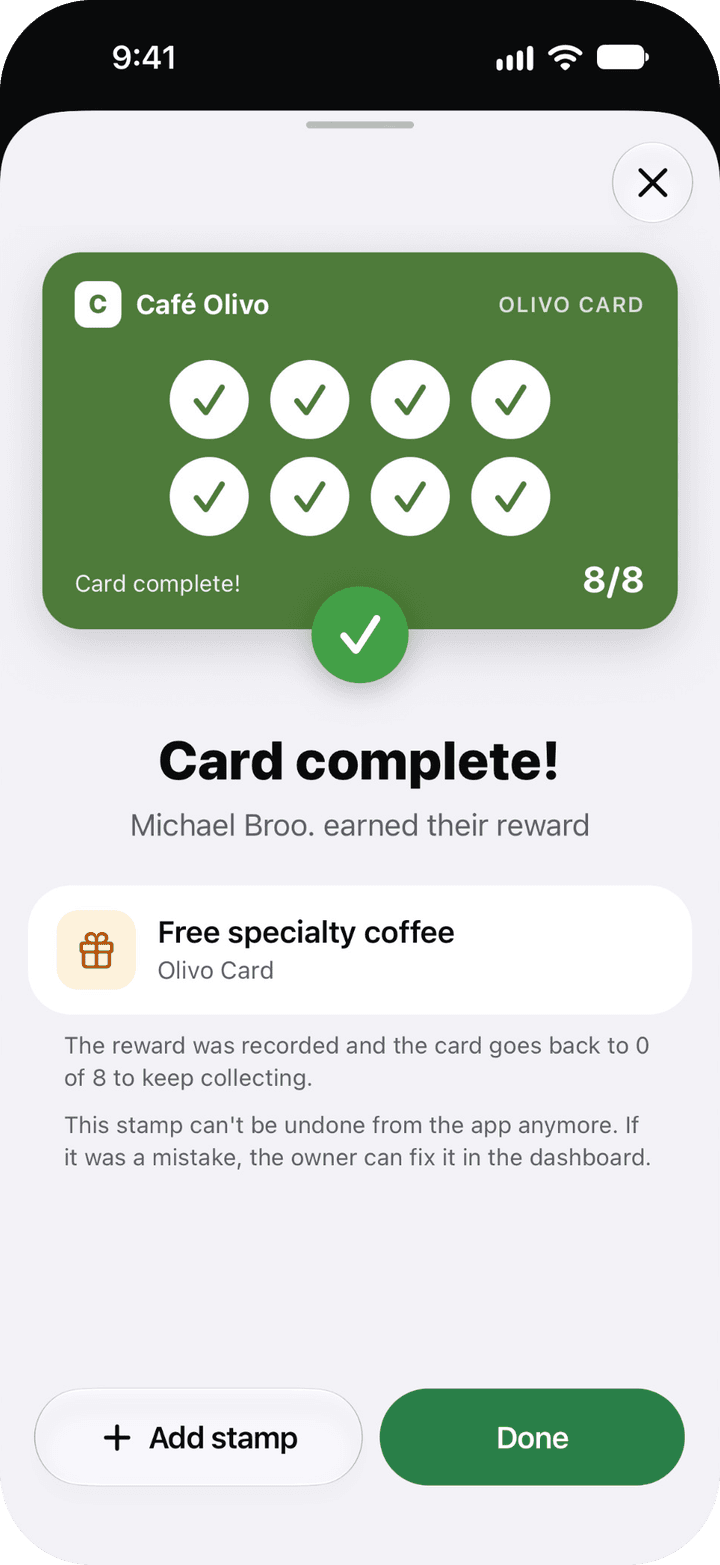
For rewards paid for with a balance (the ones on a points card, or the ones that cost less than a full card):
- Scan the customer’s cardSame as for adding.
- Tap “Redeem”When the customer has enough for a reward, the app says so on their card (“Can redeem 1 reward”) and Redeem appears: a button next to the add button, the gift icon on a stamp card, or the button with the number of rewards on a points card. The list separates the Available rewards from the ones Coming up, and for those it says how much is missing, whether they need a tier, or whether they are out of stock.
- Confirm the redemptionTap Redeem on the reward. The app asks before it deducts anything and shows the balance before and after. If the reward has a minimum purchase, it first asks for the ticket amount.
- Hand over the rewardThe app shows Reward redeemed, with Undo redemption for 30 seconds. Add purchase takes you back to add today’s purchase.
Every stamp, add and redemption is recorded with the person who did it and the location chosen in the app. In the dashboard, Dashboard → Overview can be viewed location by location, and the Activity log (the link See the whole activity log, under recent activity) shows who did each movement.
Vouchers are redeemed from the same tab: see Redeem at the counter.
Customers tab: sign up and look up
Sign up a new customer shows your business’s sign-up QR code on the screen. Turn the phone toward the customer: they scan it with their own camera, fill in their details on their phone and save the card to their Wallet. Tap Done when it is finished.
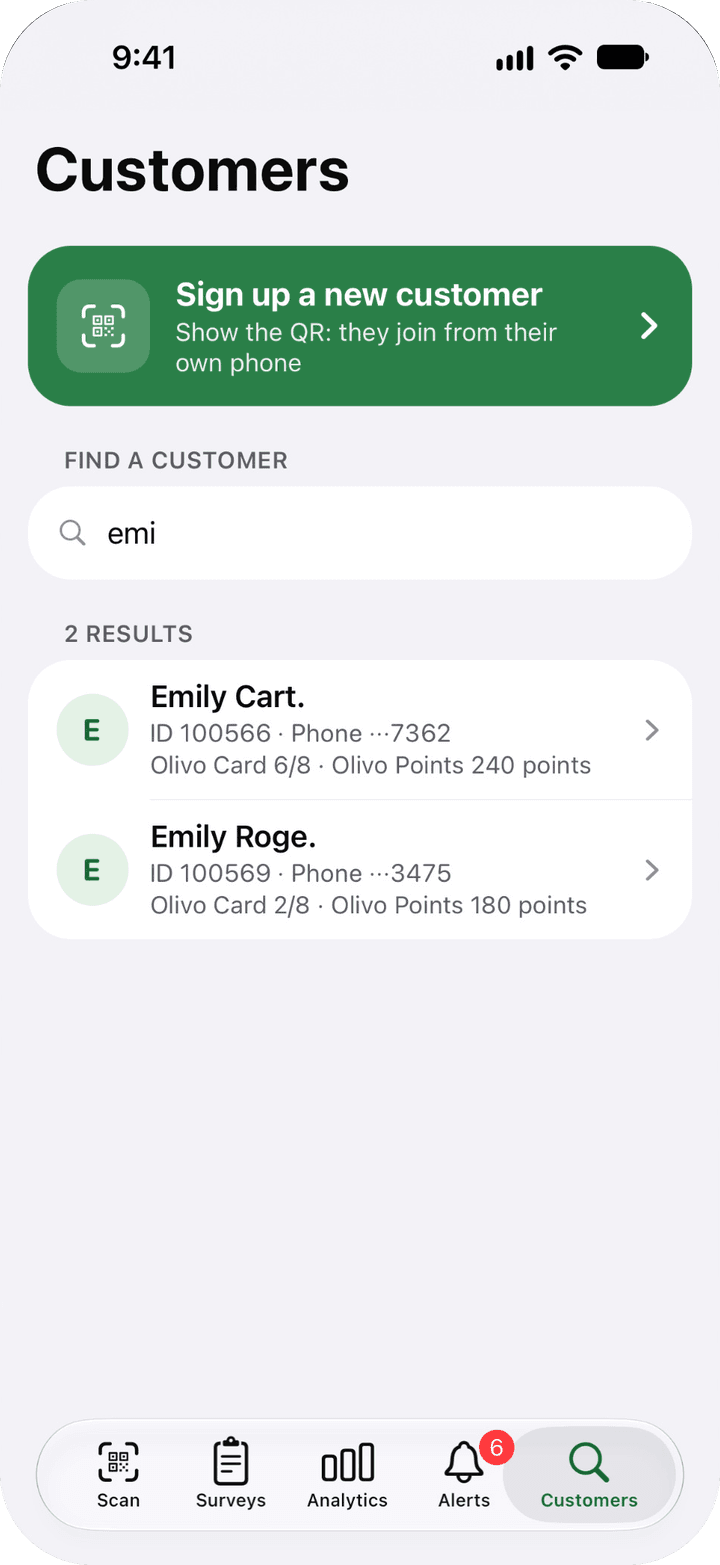
Find a customer appears when you have adding without a QR turned on (next section). It is a single field: Name or card ID. Type at least 3 letters of the name, or the ID the customer sees on their card. Each result shows the short name, the ID, the last 4 digits of their phone to confirm it is the right person, and the balance of their cards. The search only sees your business’s customers and shows up to 8 results: if more people have that name, add the last name too or search by ID.
Add without a QR
For when the card cannot be scanned: a broken screen, a dead battery, or the customer did not bring their phone. The same rules apply as when scanning (promotions, tier and the reward for a completed card included). It does not apply to the membership card.
You turn it on per card: in Dashboard → Cards open your card, go to the Program tab, and in Adding without QR turn on Allow in the POS app. There you choose who can add in the app (Admins only or Admins and staff) and the limits for staff. The owner and admins have no limit, and can also add from Dashboard → Customers.
- Find the customer and tap themIn the Customers tab. If they have several cards, pick which one to add to.
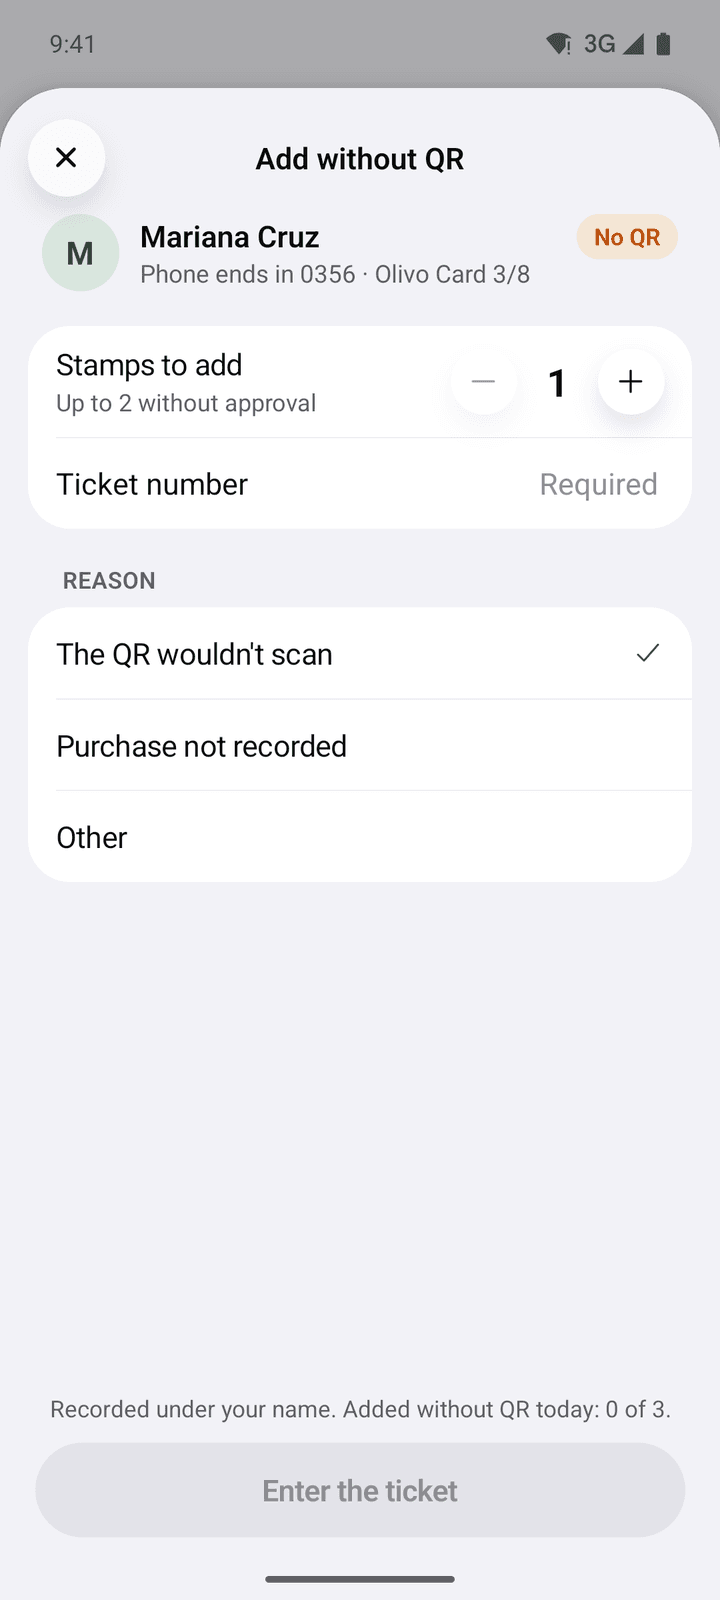
- Say how muchThe stamps to add, or the purchase amount on a points card (the app works out the points). Below you see the limit, for example “Up to 3 without approval”.
- Ticket and reasonType the ticket number if the card asks for it and pick the reason: The QR wouldn't scan, Purchase not recorded or Other (you type it).
- Tap the add buttonThe button at the bottom says how much you are adding. The add is recorded under your name, with the reason and the ticket, and the customer sees the change on their card. You have 30 seconds to Undo.
The limits you can set for staff:
- A maximum of stamps, or a maximum amount, per add.
- Adds without QR per person per day (the app keeps count: “Added without QR today: 0 of 5”).
- Ask for the ticket number.
If an add goes over the limit and the card has Ask for a PIN above the limit, the app shows Approval needed: the owner or an admin types their Manual-earn approval PIN on that phone (4 digits; you set it when you edit that person in Dashboard → Staff, and it is different from the Kiosk PIN). The add records who did it and who approved it. Without that option, or if nobody has set their PIN, an add over the limit cannot be recorded in the app.
Surveys tab and kiosk mode
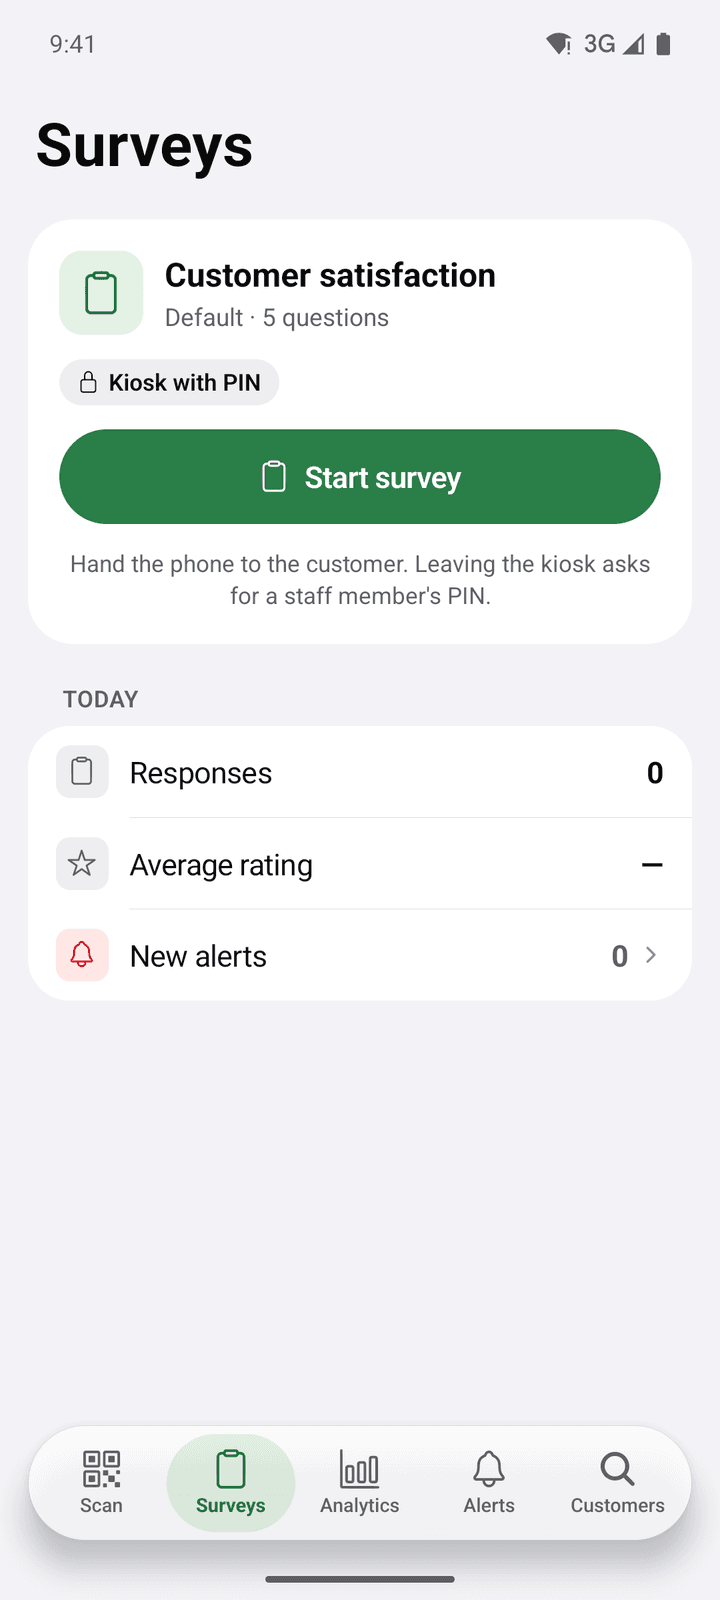
The tab shows your main survey (in the app it says Default) and the Start survey button; with Pick another survey you open any other survey you have active. When you start it, the app goes full screen and hides the tabs: hand the phone or tablet to the customer.
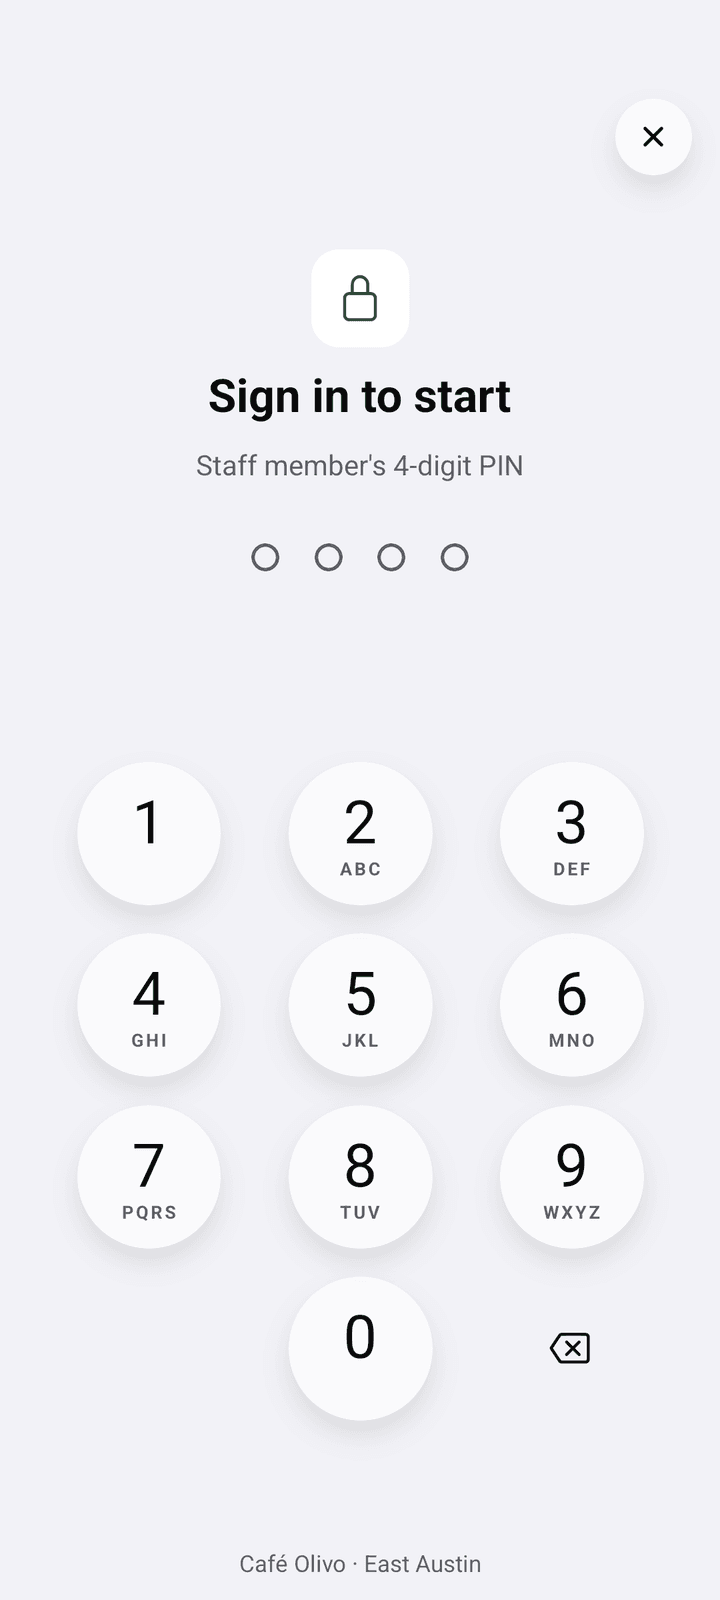
- If the survey has Kiosk with PIN, before each survey the app shows Sign in to start: whoever is serving types their 4-digit kiosk PIN and the response is recorded under their name. If the survey asks for a table number, it is captured after the PIN. When it ends, New survey gets the next one ready and Exit kiosk asks for a PIN again, so a customer cannot reach the rest of the app.
- Without the kiosk, the survey opens straight on the questions and, when it ends, the app goes back to the tab.
At the bottom, under Today, you see the day’s responses, the average rating and the new alerts. Kiosk mode is set up in the dashboard: see Kiosk mode.
Hand over the survey after adding
If you have an active main survey at your location, when you close the customer’s screen after adding stamps or points the app asks Hand over the survey? with the survey’s name and how many questions it has. Hand over the phone opens the survey full screen so the customer answers right there; Not now dismisses it and you are back at the camera.
Analytics tab
A summary of the period without opening the web dashboard. At the top you pick the period (Today, Last 7 days, Last 30 days, This month or Pick dates…), what to compare it with (the previous month or the previous year) and the location, or Whole business.
- Loyalty: new customers (if you pick a location, the customers served there), stamps or points issued, redemptions and the business’s total customers, plus a by-day or by-week chart of what was issued, what was redeemed and the new customers.
- Surveys (if your business has surveys): responses, rating, NPS and CSAT, the distribution of ratings, promoters, passives and detractors, and how many started surveys were completed.
Alerts tab
This is where the alerts from your surveys arrive (a Low rating, an NPS detractor, a Thumbs down or a Negative comment), grouped by day and by survey, with a red number on the tab while any are unread. Choose between Unread and All; the filter button changes the period (last 48 hours, 7 or 30 days) and the location, and has Mark all as read. Swipe an alert to the left to mark it as read, or tap it to see the full response: the survey, who served the customer, the location and the date. Replies to the customer are written from the dashboard.
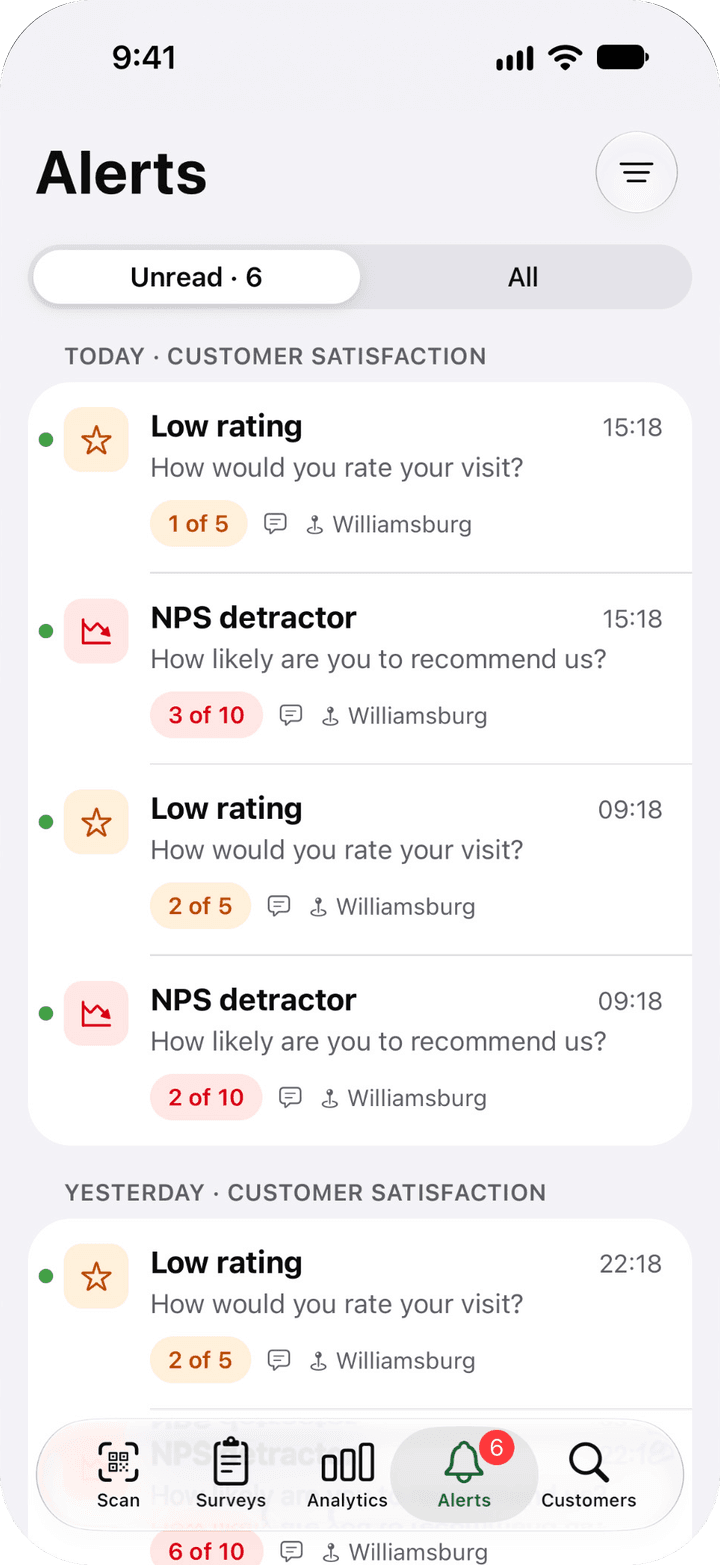
Which alerts sound on each phone is chosen in Settings → Alerts on this phone. The rules that create the alerts are in Alert rules.
Settings and account
Settings open from the Scan tab: tap the person icon at the top right, or the name of your location.
| Setting | What it does |
|---|---|
| The row with your name | Opens Account: your business, your role, your location and until what day the session lasts on that phone. Your password and two-step verification are managed in the dashboard. |
| Location | Switch the location you are working at, if you have more than one. |
| Alerts on this phone | All alerts, Critical only (NPS detractors only) or Mute. |
| Language | The app shows in your business’s language (Business). Here you can pick another one just for that phone: Spanish (Mexico), Spanish (Spain) or English. The kiosk survey always shows in the business’s language. |
| Appearance | System, Light or Dark. Text size follows the phone’s own settings. |
| Vibrate on scan | Turns on or off the vibration that confirms each read. |
| Help | Support on WhatsApp and by email. |
| Sign out on this phone | To get back in you have to type the email and password. |
If the internet goes out
To look up a customer (when scanning or by name) and to redeem, the app needs a connection. If the internet drops right as you add a stamp or points, the app saves the record, tells you Offline and sends it on its own when the signal comes back; you can also tap Try again. Surveys keep working: the app uses the last saved version and sends the responses when it reconnects.