
Sign up customers
A customer gets into your program one way: they open your public sign-up page, leave their email and add the card to their Wallet. This chapter covers how they reach that page (by QR code, by link or invited by another customer), what you ask them for, how you see where each person signed up, and what they see afterwards in their own portal.
How a customer signs up
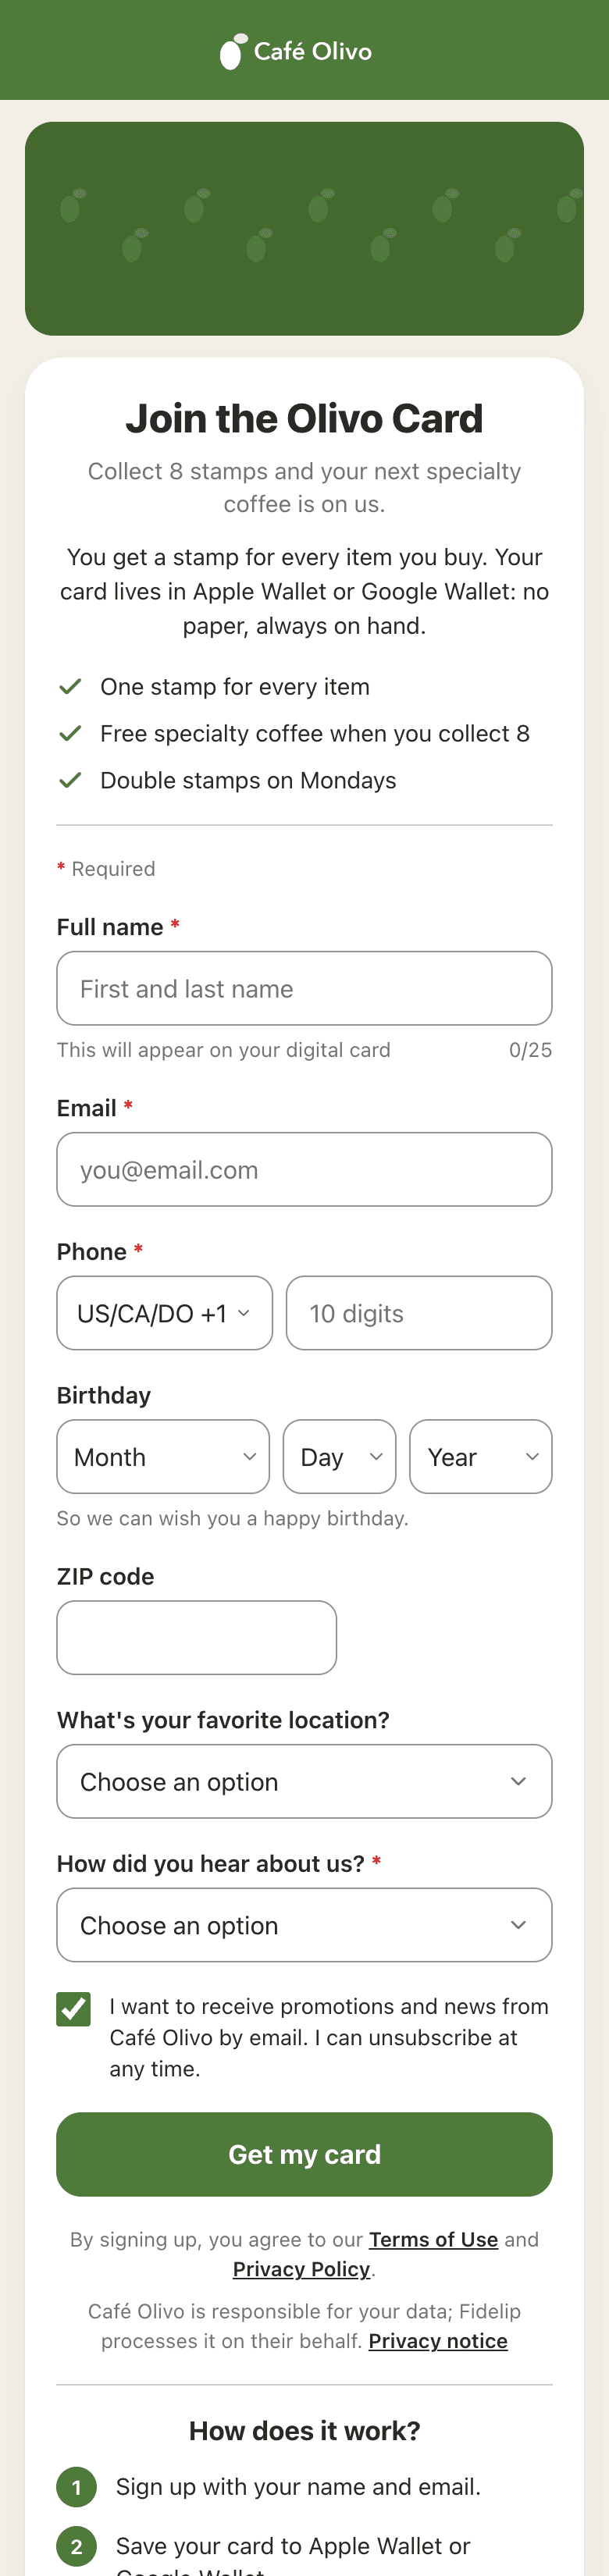
Sign-up is public and takes less than a minute. The customer opens your program link (fidelip.com/c/{slug}), types their name and email (and whatever else you ask for) and taps Join now, or the text you set on the button. If the email looks like it has a typo, such as gmail.con, the page suggests the right one before going on. When they finish they see their QR code and the button to add the card: Add to Apple Wallet on an iPhone, Add to Google Wallet on Android (on a computer, both). They do not need to create a password or download an app.
If they were already signed up with that email, the page greets them with Welcome back! and gives them their card back, not a new one.
How they reach that page
| Channel | How it works |
|---|---|
| Printed QR code | The one in your card’s QR tab (Dashboard → Cards → QR), or your business’s general one at Dashboard → Settings → Sign-up QR code to print. Download it with Download PNG or Print-ready PDF and put it at the counter, at eye level, where customers wait for their check. More in How your customer gets the card. |
| Direct link | fidelip.com/c/{your-business} opens your first active card; each card also has its own This card’s link, in its Sign-up tab. Use them in WhatsApp, your Instagram bio, your website or the footer of your emails. An inactive card does not open: the link answers “This sign-up link isn’t available”. |
| The staff app | In the Customers tab, Sign up a new customer shows your sign-up QR code on the screen: the customer scans it with their camera and signs up on their own phone. Useful when you do not have the printed QR code at hand. The location the employee has selected in the app is recorded as the origin. Details in Customers tab: sign up and look up. |
| Invitation from another customer | The referral link of someone who is already signed up (see Referral program). |
What you ask for
You set it in Dashboard → Cards → Sign-up (open any card) or in Dashboard → Settings → Sign-up form and sign-up page: it is the same form. There is one form for your whole business, so what you change applies to all your cards, and only the owner or an admin can change it. What you ask for and its order are saved right away.
Under What you ask for, each field has a switch in Ask and, if you ask for it, a checkbox in Required. Name and Email are Always required: the name shows on the Wallet card and is how your staff find the customer in the app; the email goes right after the name, and it is how we recognize someone who already has their card, how they sign in to their portal and where your vouchers reach them.
- Your choice: Phone, Birthday (Month and day, which is enough to greet them, or Full date with year), Postal code, Gender, Age and Address (which already includes the postal code). Drag the handle of each row to change the order on your page.
- Company, where your customers pick their partner company from a list, is on the Enterprise plan.
- Your own questions: up to 5 with Add a question (text, number, date or a list of options), such as their favorite location or how they heard about you. They are ordered with the other fields, and the answers show on the customer’s profile, under Sign-up answers, and in the Excel file. Do not ask for sensitive data (health, religion, political views…): the law protects it specially. If you remove a question, the answers already given are kept.
- Promotions checkbox: asks permission to email them promotions. It shows ticked by default (with Show it already ticked you can turn that off), but in Europe, Canada and some Latin American countries it always shows unticked, because the law there requires explicit permission.
Someone who signs up from a survey only gives their name, email, phone and birthday.
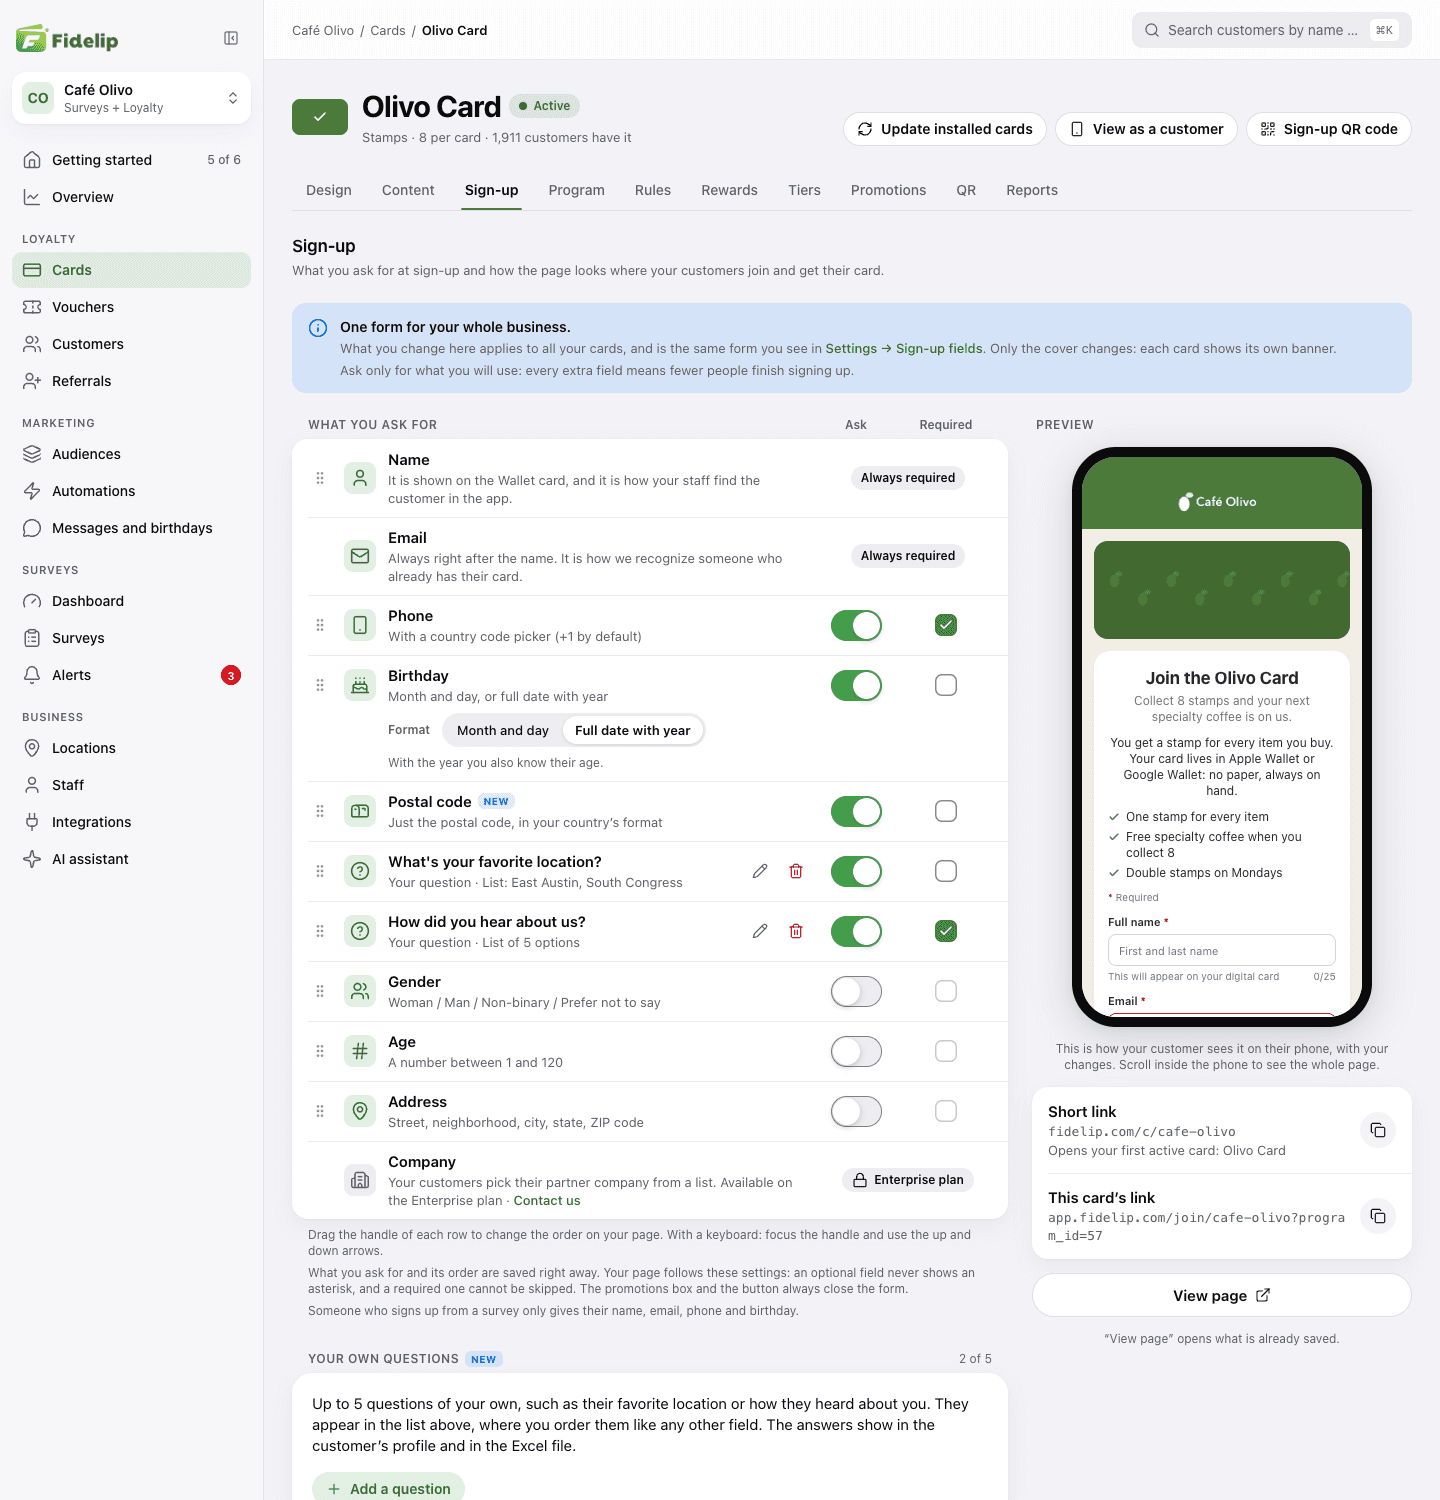
Ask for the minimum. Every extra field lowers the share of people who finish signing up; if you are unsure about a field, leave it optional.
How your sign-up page looks
Further down, Sign-up page lets you give it your own style, with a phone preview that changes as you edit. Under the preview you have the Short link, This card’s link and View page; at the top, View as a customer opens the page the way they see it.
- Cover and logo: your card’s banner as the cover (Use the card’s banner as the cover), the Business logo, the Logo size and the Font.
- Colors: Header, Background, Form, Button and Text. They save by themselves, and the page warns you if the text barely reads on the form.
- Texts: Title, Subtitle, Button text, Introduction and Benefits (up to 6, shown with a check mark before the form). Anything you leave empty uses Fidelip’s text, which is translated to each visitor’s language; what you write is shown exactly as typed, in every language.
The texts, the cover, the logo size and the font are saved with Save changes. There is no custom CSS: this is your legal sign-up form, and a custom style could hide the privacy notice or the promotions checkbox.
See where they signed up
If you have locations, the Sign-up origin block of the QR tab (see How your customer gets the card) creates a link and a QR code per Location and, if you want, per Register or table (optional). Each new customer is recorded with that point, and you see it under Customers by sign-up origin, in the Signed up at location filter of Dashboard → Customers (More filters) and in the Excel file. Only the locations your plan includes get their own link; the others show locked with Go to Billing. Nothing here ever rejects a sign-up: a link for a location that is not included signs the customer up like the general link, and customers from before October 2026 are counted together with the general link.
Referral program
Every customer gets a 6-character invitation code when they join. When someone signs up with their code (fidelip.com/c/{slug}?ref=ABC123), the page tells them who invited them and, depending on how you set it up, both of them get a bonus in stamps or points.
You set it up in Dashboard → Referrals, under Bonuses (the owner or an admin): turn on Give a bonus for invitations and set the Bonus for the customer who invites (1 to 1,000 stamps or points) and the Bonus for their friend (0 to 1,000; 0 = nothing). Under When are they paid? you choose When their friend signs up (right away, even if the friend never comes in to buy) or After their first purchase, which is the Recommended one: you only pay for friends who actually come in, it is checked every hour and an undone purchase does not count. It is saved with Save changes and applies to new invitations.
- While the bonuses are on, the back of each customer’s digital card shows their invitation link; when you turn them off it disappears, and installed cards update on their own.
- Each bonus goes to that person’s oldest stamp or points card, and their digital card updates on its own. A membership card does not receive bonuses.
- The customer who invites is paid for at most 3 invitations a day (counted by your business’s local time). Any more are still recorded, with no bonus for them; the friend’s bonus has no cap.
- If you turn the bonuses off while invitations are waiting for the first purchase, those are never paid, even if you turn the bonuses back on; the page tells you how many there are before you confirm.
Further down, Invitations lists each one with its status (Paid, Waiting for a first purchase or No bonus) and, if it ended without a bonus, the reason: Daily cap of 3, Bonuses off or No stamp or points card. Emails stay hidden until you choose Show data. Invitations are counted even when the bonuses are off.
Where you see who signed up
In Dashboard → Customers each person appears as soon as they sign up, newest first. Search by name, email or phone (4 digits of the phone are enough), filter with More filters (by Sign-up date or Signed up at location, among others) and open their profile to see their cards, their history and their Sign-up answers.
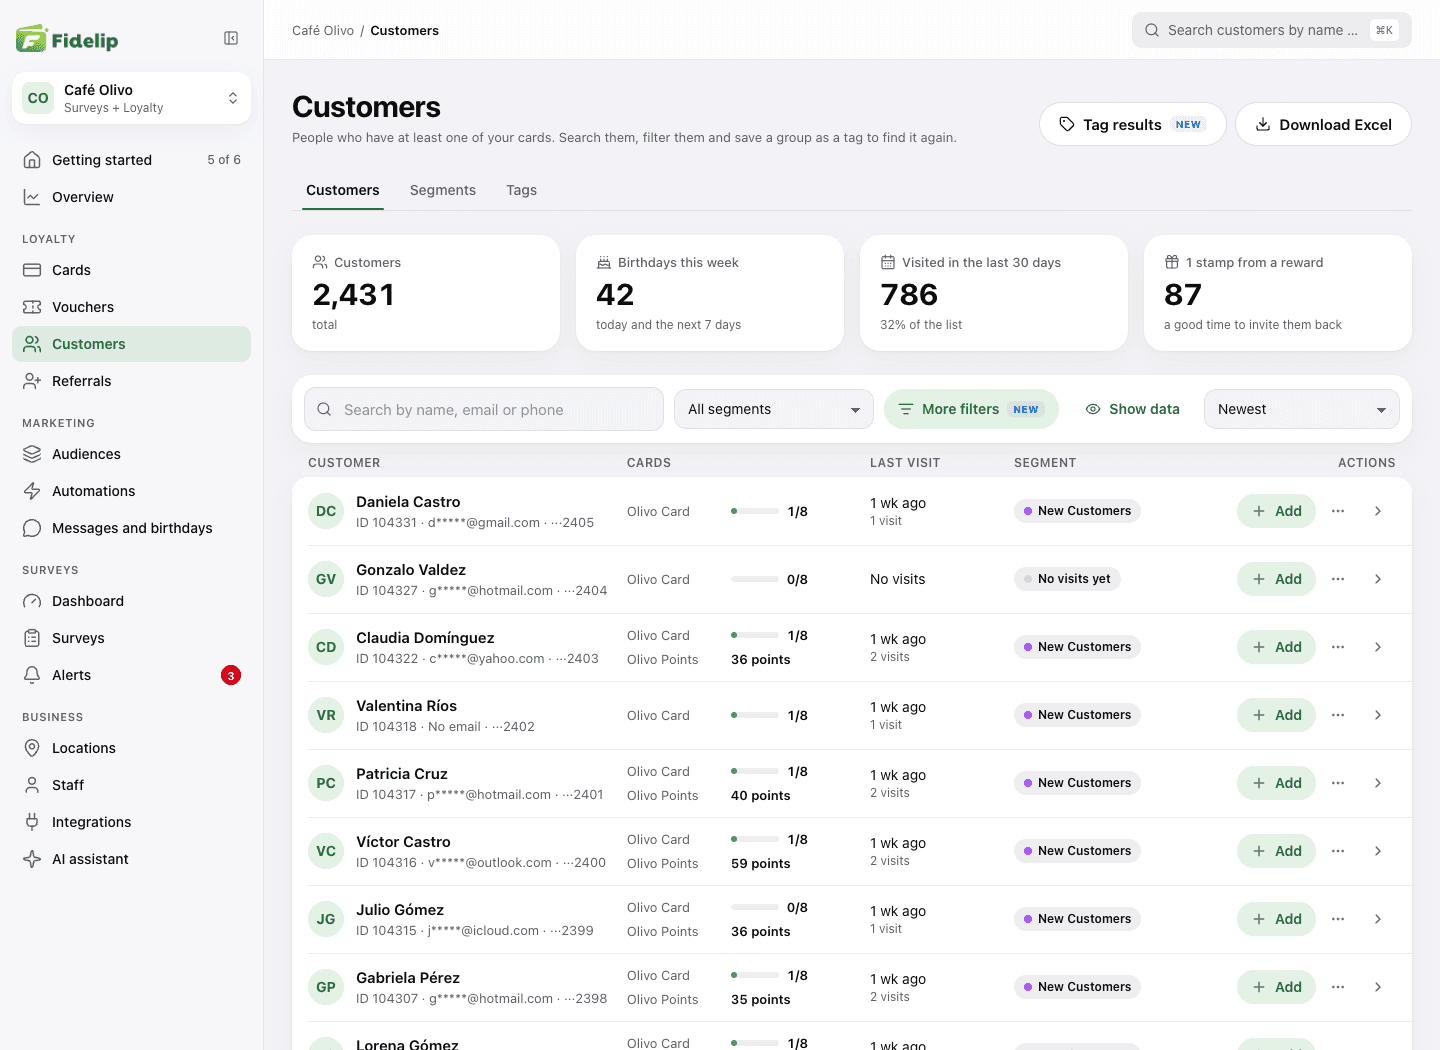
- Email and phone stay hidden until you choose Show data, and who viewed them is logged.
- Download Excel asks for a code that is emailed to you, and only the owner or an admin can download it.
- Only the owner and admins see this list; your team looks customers up from the staff app (Customers tab: sign up and look up).
What your customer sees: their portal
Every customer has a portal to see their own account at cliente.fidelip.com/{slug}; the link is on the back of their Wallet card. They sign in with their email, no password: they ask for Send sign-in code, get a 6-digit code and type it in Verify and sign in. It has three tabs:
- Cards: their cards with their balance and progress, their rewards and their vouchers. Opening a card shows Rewards and Activity.
- Invite: their code and link, to copy or share on WhatsApp, and who they have invited.
- Profile: their details (only the ones your form asks for; the birthday can be changed once a year) and Privacy and data, where they download a copy of their data (Download my data) or delete their account (Delete my account: it erases their balances and history and cannot be undone). In Europe and Canada they also choose there whether they get Promotions.
Ask for their opinion
Signing up a customer is half of it; the other half is finding out how it went. Fidelip surveys are short questions the customer answers from their phone, and they can give stamps or points for completing them. All of that (the 15 question types, conditional logic, kiosk mode, automatic emails and alerts) lives in its own chapter.
- Create the surveyIn Dashboard → Surveys tap Create my first survey (or New survey, if you already have others). Pick a template with Use template or start Blank with Create draft, which stays inactive until you turn it on. You can change everything later.
- Choose how it reaches themA QR code on the table, a link on WhatsApp, the tablet in kiosk mode, or the staff app after you charge them.
- Review the responsesThe survey’s statistics give you NPS, CSAT and the breakdown by question, and alerts tell you when someone leaves a low rating.