
Create your Fidelip account
Creating your account takes about five minutes. After that you get a 10-day free trial with full access to the platform and no contract. You are not charged during the trial; when it ends, you are charged for the plan you chose, unless you cancel first.
Sign up step by step
Signing up starts with designing your card, not filling in a form. At the top you see your progress in three stages, Your card, Your business and Your account, and your card takes shape in view, the way your customers will see it (on a large screen, under the title How your customers will see it and the badge Live): every choice repaints it instantly. From the second screen on, Your choices so far sums up what you have picked, and each row has a Change button that takes you back to that screen. We only ask for your account details at the end, and what you built is saved and applied for you.
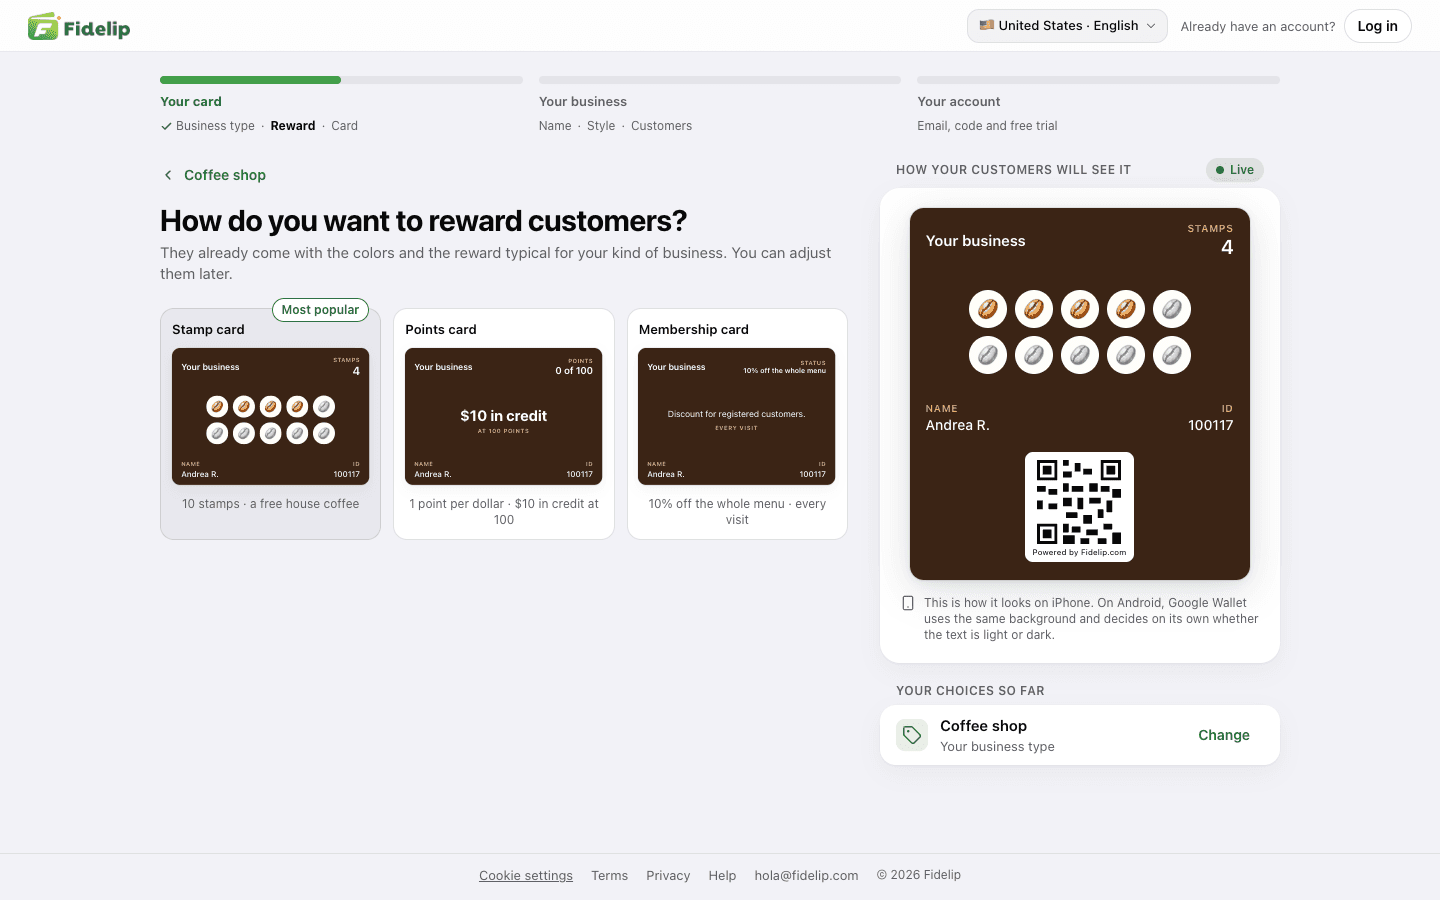
- Go to fidelip.com and get startedClick Create free account. It takes you to id.fidelip.com/create. You don't need an account yet.
- Choose your business typeThere are twelve, from coffee shop and restaurant to barbershop, gym, vet and car wash; if yours isn't listed, choose Other business. This choice sets the colors, stamps and typical reward you will see already filled in on the next screens.
- Choose how to reward customersYou see three ready-made cards with the colors and reward typical for your business type: Stamp card, Points card and Membership card. The most common choice for your business type is tagged Most popular. On a phone you see one at a time: switch between Stamps, Points and Membership, then tap Choose this one.
- Set up your cardIt depends on what you chose. Stamps: how many stamps the card holds, from 6 to 10, and what the reward is. Points: how many points customers earn per dollar spent, how many points the reward costs and what it is. Membership: the benefit in a few words (up to 30 characters) and how often it can be used: Every visit, Once a month or Once a week. The reward and the benefit come with suggestions for your business type: pick one or type your own.
- Name your businessType it in Business name. It is what your customers see on their Wallet card, so write it the way you want the public to see it. Your sign-up link comes from it too,
app.fidelip.com/join/your-business, shown under the field. We tell you right there if it is already taken, and while it is, you can't continue. - Choose the color and the stampTwelve colors, six with a Dark background and six with a Light background, each pair tested so the text on the card stays readable. If your card is a stamp card, you also pick the Stamp: the ones for your business type first, then the ones that work for any business. Points and membership cards have no stamps, so you only pick a color. Click This is my card when you are done. You can change all of this later from your dashboard.
- Decide what to ask your customers forTwo options, drawn as the form your customer will see: Just the essentials (name, email and birthday), which is the Recommended one, or I want to get to know them, which adds mobile number and gender. Email is always required: it is how Fidelip identifies each customer. The birthday turns on the automatic birthday greeting on the card. Choosing an option is the action of this step: it takes you on to creating your account. You can change it later from your dashboard.
- Create your accountEnter your Full name, Phone and Email, then click Continue. The country code comes pre-set from the country you are in, and you can change it. Use an email you can open right now: we send you a code to verify it.
- Check your emailYou get a 6-digit code. Type or paste it: it verifies itself at the sixth digit. It expires in 10 minutes; if it doesn't arrive, check your spam folder or click Resend code (you can ask for another one every minute).
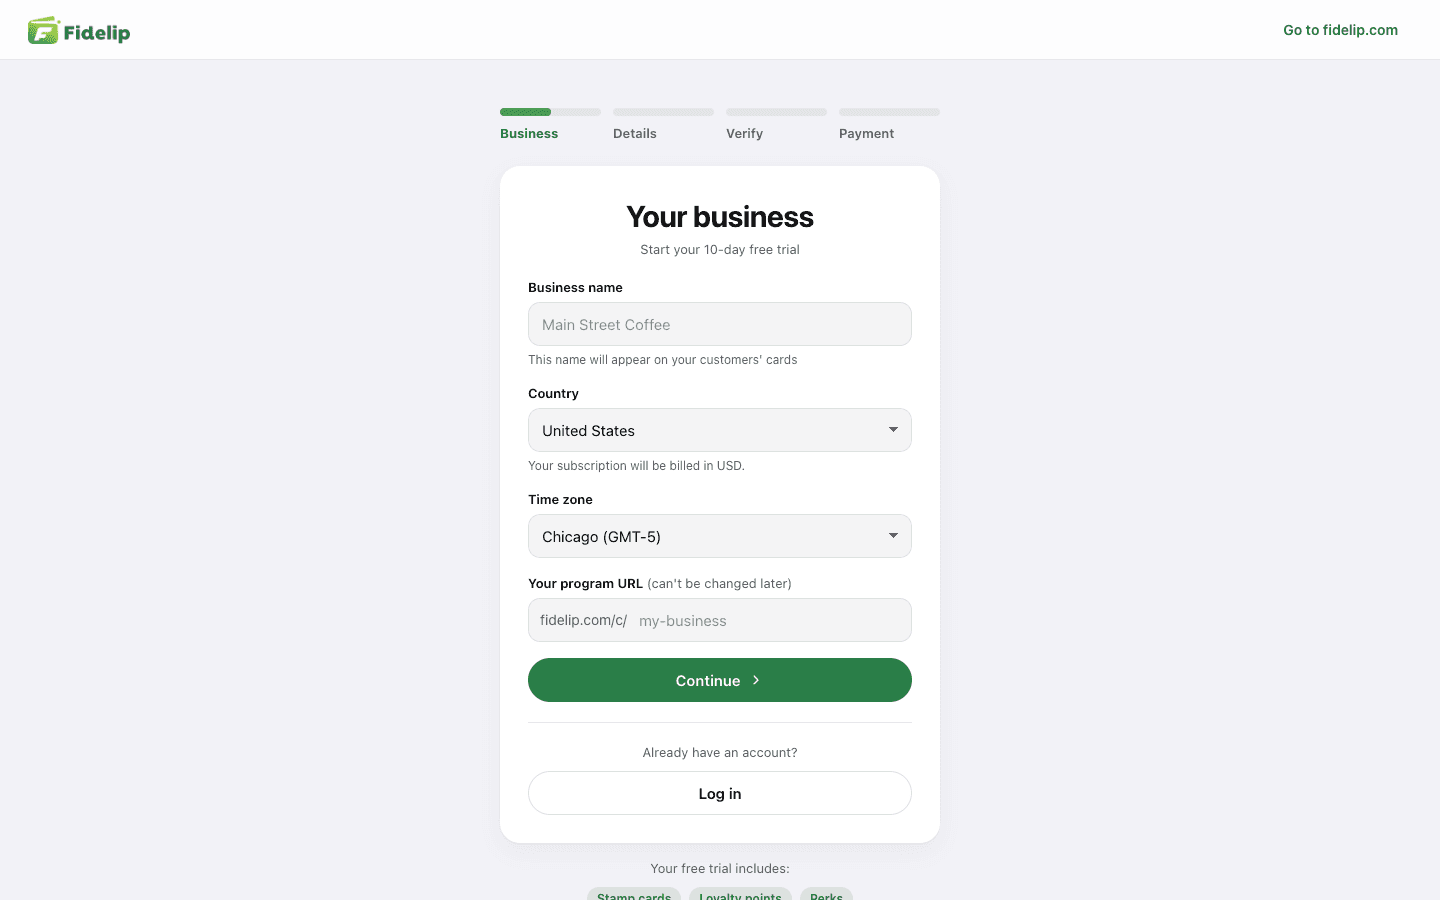
- Create your passwordOnce the code is right, the screen changes to Email verified: type your Password and repeat it in Confirm password. It needs at least 8 characters, an uppercase letter, a lowercase letter and a number, and the checklist ticks off as you type. Because you already named your business, it is created for you with that name and link, and you go straight to payment. If you went straight to
id.fidelip.com/signupwithout designing anything, one more step appears here, Your business: name, country (it sets the currency of your subscription) and your program's link. - Choose your plan and add your payment cardOn Last step you pick a plan, monthly or yearly (Plans and limits explains each one): Surveys + Loyalty comes pre-selected and is the one that includes the card you designed; Surveys is surveys only, and Enterprise is quoted by sales. The screen shows each price in your country's currency. Under Customize your plan you can add Locations and Loyalty cards; the plan includes one of each. Add your payment card under Payment information (Stripe processes the charge), tick the box to accept the terms and click Start free trial. Nothing is charged today: the screen shows the date of the first charge, and if you cancel before then, you don't pay. When it finishes, the card you designed is created in your dashboard. You don't have to build it again.
If you pick Surveys on the payment screen, the card you designed is not created, because that plan has no loyalty; the screen warns you before you pay. If you want the card, choose Surveys + Loyalty: it includes surveys too. In Mexico only, Billing details (optional) lets you enter your tax details right there; in other countries you add them later in Dashboard → Billing.
Only want surveys? At the bottom of the first screen, click Only want surveys?: it is a shorter path with no card. You answer Who are you going to ask?, then Choose your survey, drop the questions you don't want with Remove, name your business and click Create my account. You reach payment with the Surveys plan already selected. You can also start it directly at id.fidelip.com/create/survey.
If you leave halfway, you don't lose what you built: the design is kept in your browser tab (reloading or using Back doesn't erase it) and, once you have typed your details, with your sign-up too. If you had already created your password, go back to Create your account with the same email: the screen asks only for that password (You already have an account in progress) and Continue with my account takes you back to where you left off. Logging in with that email takes you to the same place.
Use an email that several people on your team can open (for example [email protected]). Later you can invite colleagues with their own passwords, but the main email is the one that receives billing notices.
After you sign up
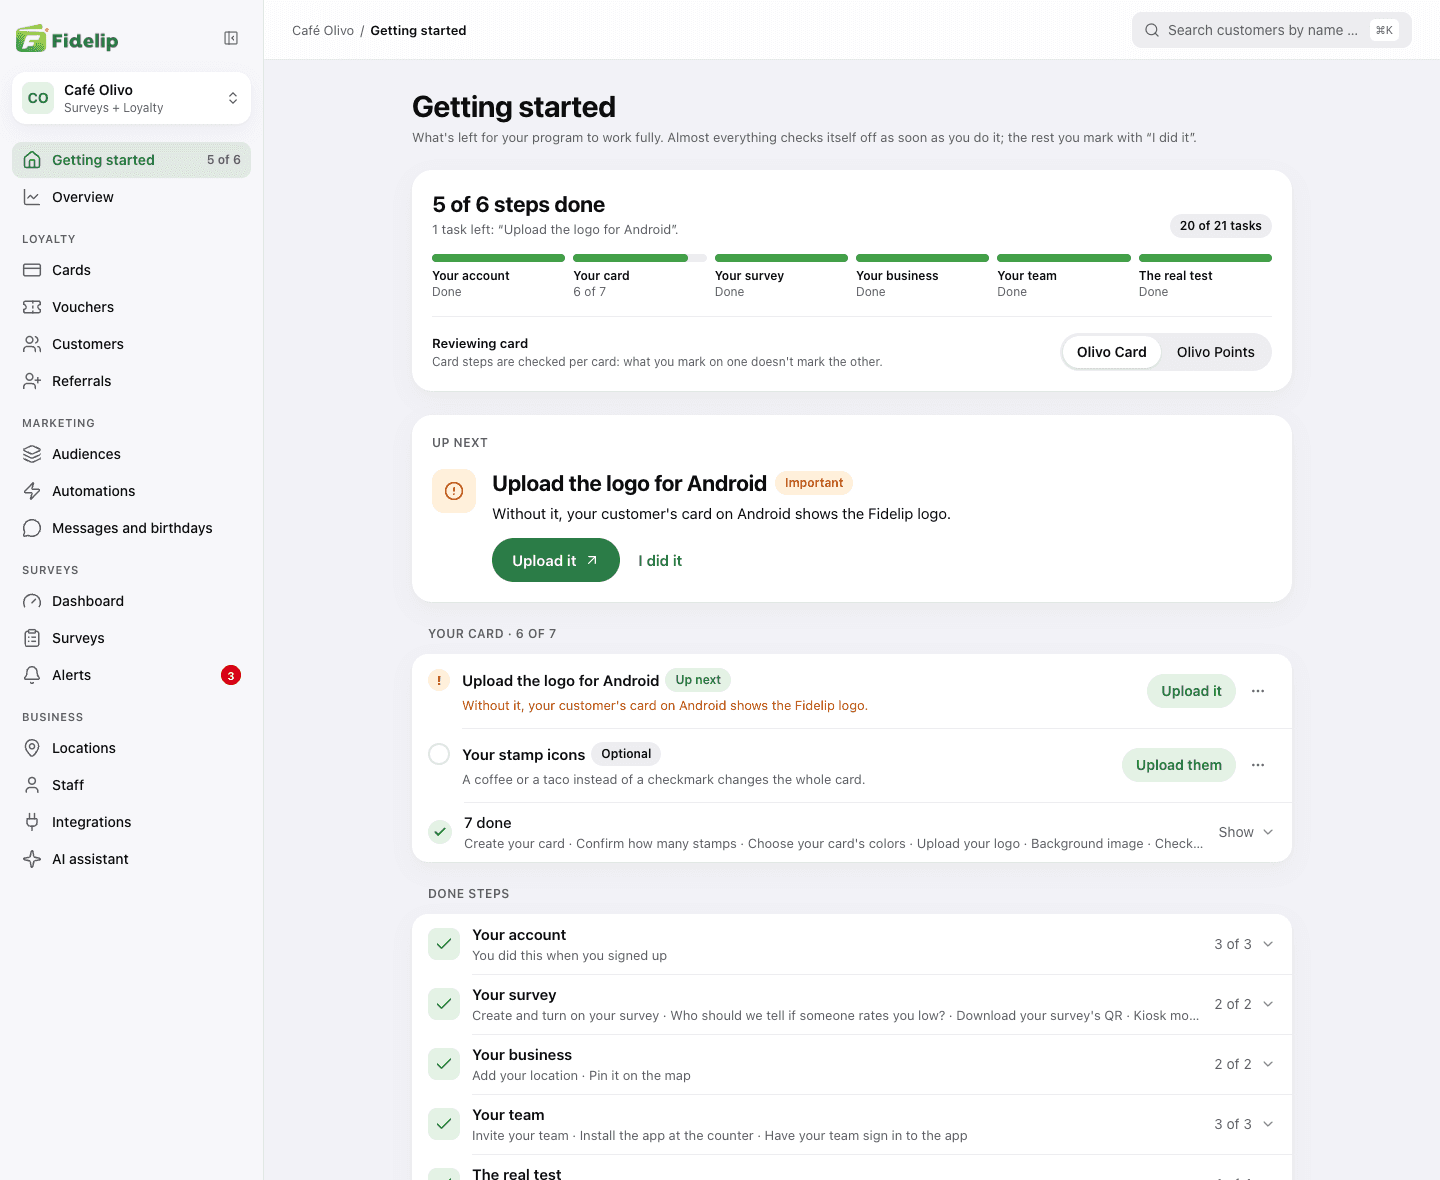
When the payment is done you land in the dashboard at app.fidelip.com, on Getting started, the setup guide. While you work through it, you find it at the top of the menu (Dashboard → Getting started), with how many steps you have done. At the top you see your progress and, under Up next, one step at a time with a button to do it. Below is the full list, grouped like this:
- Your account: the account, your sign-up link and your plan. They come checked off from signup, and you find them under Done steps.
- Your card: what the design doesn't cover. Your logo and the logo for Android, the background image, your stamp icons, the real name of the reward and your contact details.
- Your survey: if your plan includes surveys, turning it on, who to alert when someone rates you low, the QR code and kiosk mode.
- Your business: adding your location and putting it on the map.
- Your team: inviting your staff, installing the app at the counter and getting them to sign in to it.
- The real test: printing your QR code, signing up yourself first and the first real stamp (or redemption, or response).
Steps Fidelip can check are ticked off on their own when you do them; the rest you tick yourself with I did it. If one doesn't apply for now, Not now moves it to the skipped list, and Resume brings it back. Some steps are optional and don't count toward your progress. When you finish everything, the page says so (Done. Your program is live.); a week later Getting started moves to the bottom of the menu as Setup guide, and the page stays there. You can also hide it sooner with Hide Getting started from the menu. At the bottom of the menu, Help opens this manual in a new tab.
Logging back in
Go to id.fidelip.com/login, enter your account's email and password and click Log in: it takes you to your dashboard. If you turned on two-step verification, it then asks for the 6-digit code from your authenticator app, or Use a recovery code if you don't have it at hand. If you forgot your password, click Forgot your password?: we email you a code so you can create a new one. After 5 failed attempts in a row the account pauses for 15 minutes; Troubleshooting covers what to do if something keeps you out. To add stamps and points, your team uses the counter app (Use the staff app at the counter).